Why Homemade Mustard Powder Beats Store-Bought Every Time
Imagine cracking open a jar of mustard powder and getting hit with a sharp, sinus-clearing wave of heat. That experience is nearly impossible with the pre-ground stuff sitting on grocery store shelves. Learning how to make mustard powder at home from whole seeds gives you access to a level of pungency and aroma that commercial versions lost months ago.
The reason is chemistry. Mustard seeds contain compounds called glucosinolates. When you grind those seeds, an enzyme called myrosinase breaks the glucosinolates down into isothiocyanates, the volatile molecules responsible for that signature mustard heat. Here is the catch: isothiocyanates are unstable. They begin to degrade, evaporate, and isomerize almost immediately after grinding. A jar of mustard powder that has been sitting in a warehouse, then on a store shelf, then in your cabinet has been quietly losing potency the entire time.
Freshly ground mustard powder can contain up to 80% more aromatic compounds than pre-ground versions that have sat on shelves for months, delivering noticeably sharper heat and a more complex flavor profile.
Why Freshly Ground Mustard Powder Tastes Better
Whole mustard seeds act like tiny flavor vaults. Their outer hull protects the essential oils and enzyme systems inside from air, light, and moisture. The moment you crack those seeds open, you release the full spectrum of volatile compounds at peak concentration. Grinding right before use means those compounds go straight into your recipe instead of dissipating into the air over weeks or months. You'll notice the difference immediately: brighter color, sharper aroma, and a heat that builds with real authority on the palate.
Ground Mustard vs Mustard Powder vs Dry Mustard
A common question that trips people up in the spice aisle: is ground mustard the same as mustard powder? The short answer is yes. Ground mustard, dry mustard powder, and dry mustard are all the same product, just whole mustard seeds that have been milled into a fine powder. Different brands and recipes use different names, but they refer to the identical ingredient. If a recipe calls for any of these, you can use them interchangeably at a 1:1 ratio.
This guide walks you through the complete seed-to-powder process: choosing the right seed variety, deciding whether to toast or grind raw, selecting equipment, grinding technique, sifting for consistency, proper storage, and creative ways to put your fresh dry mustard powder to work. Each step builds on the last, so by the end you will have a pantry staple that genuinely outperforms anything you can buy off the shelf.
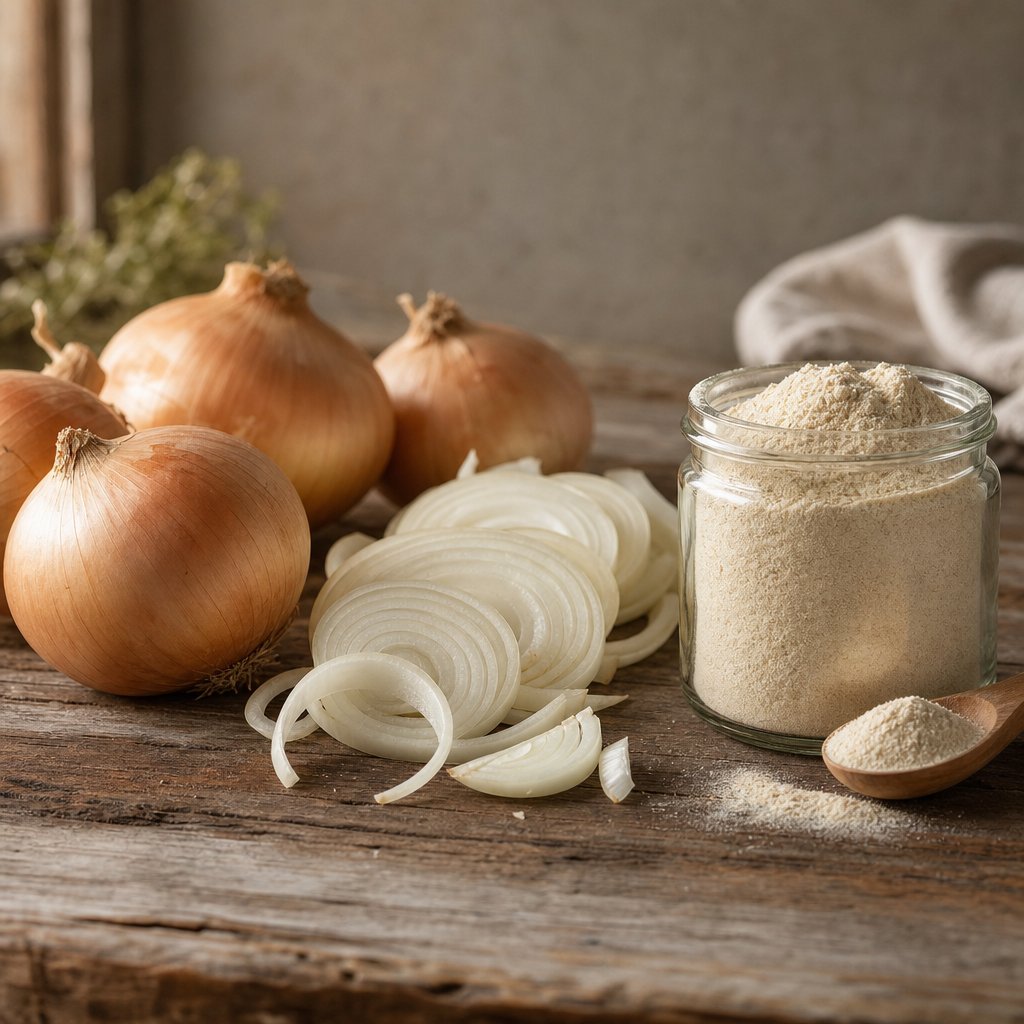
Step 1 Choose and Source Your Mustard Seeds
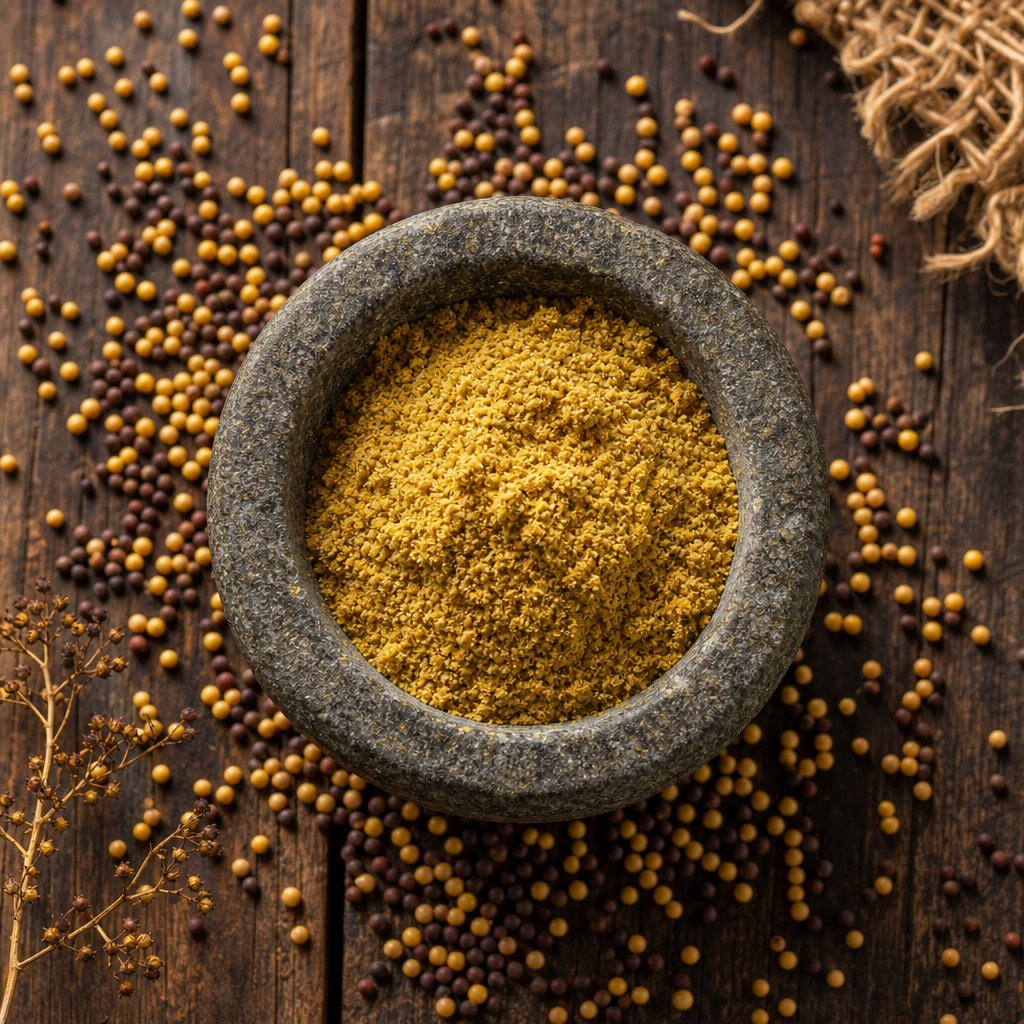
The flavor of your finished mustard seed powder depends almost entirely on which seeds you start with. Mustard belongs to the Brassicaceae family, and three distinct species dominate the spice trade. Each one produces a powder with a different heat level, color, and flavor personality. Understanding these differences is the first real decision in making mustard powder that matches your cooking style.
So what is mustard made out of at its core? Seeds, and nothing else. No fillers, no anti-caking agents, no mystery ingredients. Just whole seeds ground into powder. That simplicity means seed selection carries enormous weight in the final product.
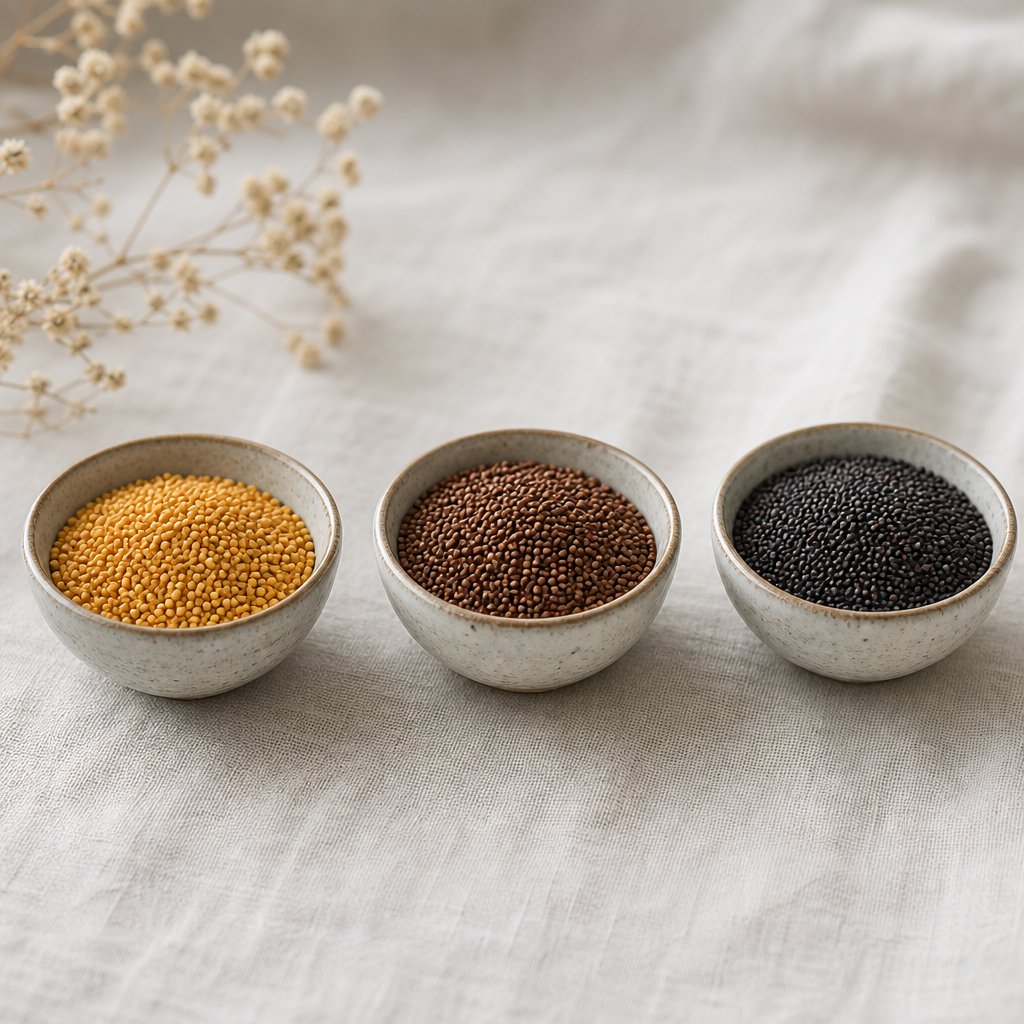
Yellow White and Brown Seed Varieties Compared
Yellow mustard seeds (Sinapis alba), sometimes called white mustard seeds, are the mildest of the three. They produce a bright yellow mustard powder with a tangy, slightly sharp flavor that lacks the nasal-clearing punch of their darker cousins. This is the variety behind classic American-style mustard and works beautifully in general cooking, baking, and mild vinaigrettes. If you want versatility without overwhelming heat, yellow mustard seeds are your starting point.
Brown mustard seeds (Brassica juncea) step up the intensity considerably. They deliver moderate to high heat with an earthy, complex flavor that has more depth than yellow seeds. Brown seeds are the backbone of Dijon-style mustards and spicy brown deli mustards. They pair well with robust foods like pastrami, roast beef, and grilled sausages. Many experienced mustard makers consider brown seeds the sweet spot between accessibility and genuine bite.
Black mustard seeds (Brassica nigra) sit at the top of the heat scale. These small, dark seeds produce the most pungent powder, delivering an intense, sinus-clearing burn that fades relatively quickly. Black seeds are a staple in Indian cuisine, where they are often bloomed in hot oil to release their sharp, nutty aroma. For hot mustard condiments or maximum-heat applications, black seeds are the choice.
| Variety | Heat Level | Flavor Profile | Best Uses | Availability |
|---|---|---|---|---|
| Yellow/White (Sinapis alba) | Mild | Tangy, slightly sharp, bright | American mustard, baking, mild sauces, general cooking | Widely available in grocery stores |
| Brown (Brassica juncea) | Moderate to High | Earthy, complex, warm | Dijon-style mustard, dry rubs, deli mustard, vinaigrettes | Spice shops, online retailers, some grocery stores |
| Black (Brassica nigra) | High | Intensely pungent, nutty, sharp | Indian cuisine, hot mustard, pickling | Indian/Asian markets, specialty spice shops, online |
A practical tip from experienced mustard makers: blending varieties produces more complex results than using a single type. A mix of brown and yellow seeds, for example, gives you layered heat with broader flavor, which is exactly how English mustard achieves its distinctive character.
Where to Source Quality Whole Mustard Seeds
Finding mustard with seeds in whole form is easier than you might expect. Standard grocery stores typically stock yellow mustard seeds in the spice aisle, though selection may be limited to small jars at premium prices. Bulk spice shops offer better value and often carry all three varieties. Online retailers provide the widest selection and competitive pricing, especially for larger quantities.
For brown and black seeds specifically, Indian and Asian grocery stores are your best bet. These markets stock mustard seeds as a cooking staple rather than a specialty item, so prices tend to be significantly lower and turnover is higher, meaning fresher product.
When evaluating seed quality, look for these indicators:
- Uniform size with minimal broken or shriveled seeds
- No discoloration, mold spots, or dusty residue
- A firm texture when pressed between your fingers
- A fresh, slightly peppery aroma when you open the bag
- Seeds stored below nine percent moisture for maximum shelf stability
Whole mustard seeds remain stable for up to three years when kept dry, so buying in bulk is practical. Just confirm the packaging date or harvest year when possible.
Yield Expectations From Seeds to Powder
Grinding reduces volume because you are eliminating the air space between whole seeds. As a general rule, one cup of whole mustard seeds produces approximately three-quarters of a cup of fine powder. The exact yield varies slightly depending on seed variety (black seeds are smaller and pack more densely) and how fine you grind. A coarser grind retains more volume, while an ultra-fine powder compacts further.
For practical planning, if a recipe calls for two tablespoons of yellow mustard powder, start with about three tablespoons of whole seeds. This accounts for the volume reduction and any material lost during sifting. Keeping these ratios in mind helps you buy the right quantity and avoid running short mid-project.
With your seeds selected and sourced, the next question is whether to grind them raw or toast them first. That single decision fundamentally changes the heat and flavor profile of your finished powder.
Step 2 Decide Between Toasting and Raw Grinding
This step is where you shape the personality of your mustard powder. The same seeds can produce dramatically different results depending on whether you grind them raw or toast them first. Think of it as choosing between a sharp, fiery mustard spice and a mellow, warm ground mustard seasoning. Neither approach is better in absolute terms, but each serves different purposes in the kitchen.
Raw Grinding for Maximum Heat and Pungency
If heat is what you are after, skip the skillet entirely. Raw grinding preserves the full enzymatic potential of the seeds. Those glucosinolates and myrosinase enzymes remain intact, ready to produce maximum isothiocyanates the moment the powder meets liquid. The result is a mustard powder with sharp, nose-clearing pungency that hits fast and lingers.
Raw-ground powder is the right choice for hot mustard condiments (like Chinese-style hot mustard), medicinal applications such as mustard poultices, and any recipe where you want the mustard to announce itself boldly. It also works well in vinaigrettes and dressings where the sharpness cuts through rich, fatty ingredients.
The trade-off? Raw powder has a one-dimensional flavor profile compared to toasted. You get heat and sharpness, but less of the nutty depth and warmth that toasting develops. For many applications, that is exactly what you want.
How to Toast Mustard Seeds Properly
Toasting transforms mustard seeds through the same chemistry that makes toasted bread more flavorful than raw dough. Dry heat triggers the Maillard reaction and brings the seed's natural oils to the surface, creating nutty, warm, complex flavors that raw seeds simply do not have. At the same time, heat partially deactivates the enzymes responsible for pungency, mellowing the final powder into something gentler and more rounded.
Here is the technique:
- Place a dry skillet (no oil) over medium heat and let it warm for about 30 seconds.
- Add your measured mustard seeds in a single layer. Do not overcrowd the pan.
- Shake the skillet frequently or stir with a wooden spoon to keep seeds moving and prevent hot spots.
- Watch and listen. Within 1 to 2 minutes, the seeds will begin to pop, darken slightly, and release a fragrant, nutty aroma.
- Remove the seeds from the skillet immediately once popping begins and transfer them to a cool plate or bowl.
That last step matters more than you might think. Seeds continue cooking in residual heat if left in the hot pan, and the line between perfectly toasted and burnt is measured in seconds. As America's Test Kitchen notes, spices need be toasted only until they become fragrant, usually 1 to 3 minutes, and if you suspect you have burned them, toss them and start over. Burnt spices contribute nothing but bitterness.
Toasted mustard powders are ideal for dry rubs, baking recipes like cheese crackers and pretzels, milder condiment preparations, and spice blends where you want warmth without aggressive bite.
- Signs of properly toasted seeds: light golden-brown color, audible popping, fragrant nutty aroma, seeds still intact and not blackened
- Signs of over-toasted seeds: dark brown or black color, acrid or burnt smell, smoking oil on the surface, bitter taste when one seed is bitten
Choosing the Right Method for Your Intended Use
You do not have to commit fully to one approach. A light toast of 30 to 45 seconds, just until the seeds warm through and barely begin to release aroma without reaching the popping stage, gives you a middle-ground powder. This lightly toasted version retains most of the raw heat while picking up subtle nutty undertones. It works well as an all-purpose mustard powder for everyday cooking.
A practical way to think about it: match the method to the role the powder will play. If mustard is the star of the dish and you want people to feel its presence, grind raw. If mustard is a supporting player adding background warmth and complexity, toast first. And if you are building a spice cabinet with different mustard powders for different jobs, make a batch of each. The seeds are inexpensive, and having both options on hand gives you flexibility that no single store-bought jar can match.
With your seeds toasted or left raw according to plan, the next consideration is what you will use to actually break them down into powder. The equipment you choose affects grind consistency, batch size, and how much heat the seeds absorb during processing.
Step 3 Select Your Grinding Equipment
The tool you use to grind mustard seeds shapes everything about the finished product: particle size, consistency, heat retention, and how much effort the process demands. You do not need expensive specialty equipment to make ground mustard powder at home, but understanding what each option does well (and where it falls short) helps you pick the right tool for your situation.
If you are wondering how to make ground mustard that rivals commercial quality, the answer often comes down to matching your equipment to your batch size and desired fineness. A single tablespoon for tonight's recipe calls for a different approach than grinding a full jar to stock your spice cabinet for months.
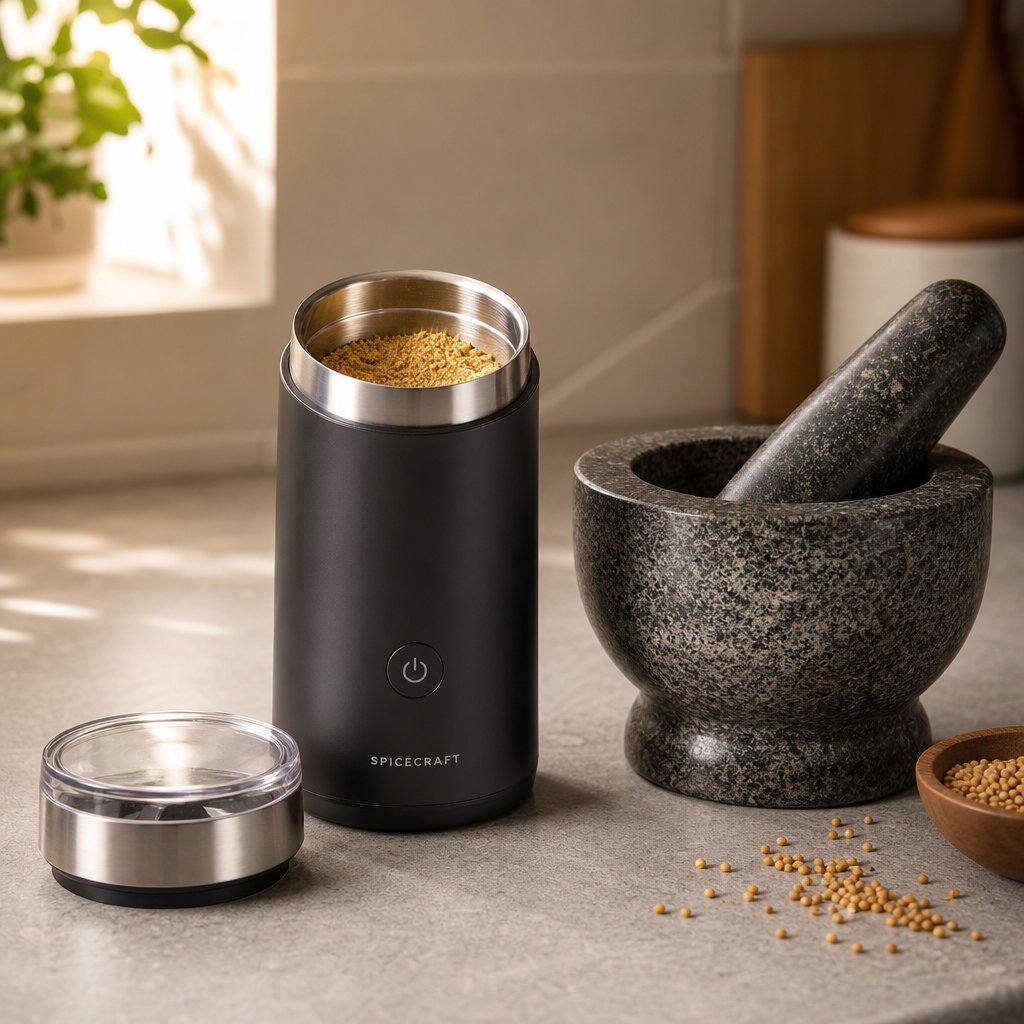
Electric Spice Grinder for Speed and Consistency
An electric blade grinder, often sold as a spice grinder or coffee grinder, is the fastest path to fine, uniform ground mustard powder. These compact devices use rapidly spinning stainless steel blades to pulverize seeds in seconds. You load a few tablespoons of seeds, pulse in short bursts, and have usable powder in under 30 seconds.
The main advantage is consistency. Pulsing and shaking the cup between bursts produces a relatively even particle size without much technique. Electric grinders also handle both small and medium batches comfortably, making them practical for everything from a single recipe to a month's supply.
The trade-off is heat generation. Blades spinning at high speed create friction, and friction generates warmth that can degrade those volatile isothiocyanates you worked to preserve. Short pulses with rest periods between them minimize this issue. Another consideration: blade grinders are prone to cross-contamination if you also use them for coffee or other spices. Dedicating one grinder to mustard (or cleaning thoroughly with dry rice between uses) keeps flavors pure.
Mortar and Pestle for Traditional Control
A sturdy mortar and pestle gives you something no electric device can: complete control over texture at every moment. You feel the seeds crack, watch the powder develop, and stop at exactly the consistency you want. For small batches of a tablespoon or two, a granite or marble mortar is genuinely practical, not just romantic.
The stone-on-stone crushing action also has a flavor advantage. As noted by experienced spice professionals, pounding bursts open more cell walls than slicing with a blade, releasing a slightly richer concentration of essential oils. You will notice the powder feels marginally more aromatic straight out of the mortar compared to a blade grinder.
The downside is effort and time. Grinding mustard seeds to a fine powder by hand takes 3 to 5 minutes of steady work per tablespoon. For larger quantities, this becomes impractical. A mortar and pestle excels when you need a small amount of coarse or medium-ground powder for a single dish, or when you want to combine grinding with mixing other ingredients into a paste.
Blender and Food Processor for Larger Batches
When you need to process a cup or more of seeds at once, a high-speed blender or food processor becomes tempting. These tools have the power and capacity to handle volume, but they come with compromises that matter for mustard powder specifically.
A high-speed blender can produce reasonably fine powder, but small mustard seeds tend to get trapped beneath and around the blade assembly. You will need to stop, scrape down, and re-blend multiple times. The result is often an uneven grind with some fine powder mixed with partially crushed seeds that require sifting and a second pass.
Food processors have the same issue amplified. Their wider, flatter bowls spread seeds too thin for the blades to catch efficiently. You need a minimum volume (usually at least half a cup of seeds) before the processor works at all, and even then the grind tends toward coarse. Multiple passes and sifting between them can eventually produce acceptable powder, but the process is slower and messier than using a dedicated spice grinder.
A dedicated burr grinder offers the most precise control over particle size. Adjustable burrs let you dial in exact grind settings that produce uniform results every time. The catch is cost and practicality. Quality burr grinders designed for spices run significantly more expensive than blade grinders, and oily seeds like mustard can gum up the burrs over time. Unless you grind spices frequently and in volume, a burr grinder is more investment than most home cooks need.
| Tool | Batch Size | Grind Quality | Effort Level | Best For |
|---|---|---|---|---|
| Electric Spice/Coffee Grinder | 1-5 tablespoons | Fine and consistent with pulsing | Low | Everyday grinding, pantry stocking, fine powder |
| Mortar and Pestle | 1-2 tablespoons | User-controlled, coarse to fine | High | Small batches, coarse grinds, paste-building |
| High-Speed Blender | 1/4 cup minimum | Uneven without multiple passes | Medium | Larger batches when no spice grinder is available |
| Food Processor | 1/2 cup minimum | Coarse, requires sifting | Medium | Very large batches, coarse grinds for rubs |
| Dedicated Burr Grinder | Variable | Most uniform and repeatable | Low | Frequent grinding, precise particle size control |
For most people learning what is ground mustard and how to produce it at home, an electric blade grinder in the 20 to 40 dollar range covers 90 percent of needs. Pair it with a mortar and pestle for those moments when you want a quick tablespoon of coarsely cracked seeds, and you have a setup that handles everything from a pinch to a full jar without breaking the budget.
Equipment sorted, the real craft begins: how you actually operate your chosen tool determines whether you end up with silky, potent powder or an overheated, uneven mess.
Step 4 Grind Your Seeds Into Powder
You have your seeds. You have your equipment. This is where the transformation happens. How do you make mustard powder that is fine, consistent, and still packed with heat? The answer lives in technique, not just tools. The difference between silky, potent powder and a dull, overheated mess comes down to timing, batch size, and knowing when to stop.
Regardless of which tool you chose in the previous step, one principle applies universally: work in small batches. Overloading any grinder produces uneven results because seeds at the top never reach the blades or grinding surface while seeds at the bottom get pulverized into dust. Small batches mean uniform particle size, which means consistent flavor in every pinch you use.
Pulse Grinding vs Continuous Grinding Technique
Before diving into specific instructions, you need to understand the two fundamental approaches to operating any electric grinder. This distinction matters more than most people realize when learning how to make mustard.
Pulse grinding means pressing the power button in short, deliberate bursts of 2 to 3 seconds each, with brief pauses between them. Each pause lets you shake the grinder cup to redistribute seeds, and it gives the motor and the seeds a moment to cool. Pulse grinding preserves more volatile compounds because it generates less sustained heat. It also gives you better control over the final texture since you can check progress between pulses.
Continuous grinding means holding the button down without stopping. It is faster, yes, but the blade spins at full speed for an extended period, generating friction heat that warms the seeds. That warmth accelerates the breakdown of isothiocyanates, the very compounds that give your powder its punch. Continuous grinding also makes it easy to overshoot your target fineness, turning what should be a medium grind into dust before you realize it.
The recommendation for mustard seeds specifically: always start with pulses to crack the seeds open, then switch to short continuous bursts only at the end if you need a finer result. This hybrid approach balances speed with heat preservation.
Timing Guide for Fine Medium and Coarse Powder
Here is exactly how to make mustard powder using an electric spice grinder, broken into precise steps:
- Measure 2 to 3 tablespoons of mustard seeds and add them to the grinder cup. Do not exceed this amount even if your grinder has more capacity.
- Secure the lid and pulse 3 to 5 times, holding each pulse for about 2 seconds. This initial phase cracks the seed hulls and breaks them into coarse fragments.
- Remove the lid and shake the grinder cup gently to redistribute the partially ground seeds. Tap the sides to dislodge any material stuck to the walls.
- For coarse powder: pulse 2 to 3 more times at 2 seconds each. Check the texture. You should see cracked pieces roughly the size of coarse sand. Total active grinding time: approximately 8 to 10 seconds.
- For medium powder: after the initial pulses, grind continuously for 8 to 10 seconds. Shake, then pulse 2 to 3 more times. The texture should resemble fine sand with no large fragments visible. Total active grinding time: approximately 15 seconds.
- For fine powder: after the initial pulses, grind continuously for 15 to 20 seconds. Shake the cup, then grind for another 5 to 10 seconds if needed. The result should feel smooth between your fingers with no grit. Total active grinding time: approximately 20 to 30 seconds.
- Let the powder settle for 10 to 15 seconds before opening the lid. This prevents a cloud of fine particles from escaping into the air (and into your sinuses).
For the mortar and pestle, the process is slower but equally precise:
- Add 1 to 2 tablespoons of seeds to the mortar. Smaller batches give you more control and prevent seeds from escaping over the rim.
- Begin with firm downward pressure to crack the seeds. Press the pestle straight down and slightly twist to crush the hulls. Spend about 30 seconds on this initial cracking phase.
- Shift to a circular grinding motion. Apply steady downward pressure while rotating the pestle against the bottom and sides of the mortar. This is the pound-and-swirl technique that produces the most even results.
- Continue grinding for 2 to 3 minutes for a medium-coarse texture, or 4 to 5 minutes for a fine powder. Periodically scrape the sides of the mortar with a spoon to bring escaped material back to the center.
- Test the texture by rubbing a small amount between your thumb and forefinger. If you feel distinct gritty particles, keep grinding. Fine powder should feel smooth and silky.
How is mustard made at commercial scale? Industrial mills use temperature-controlled roller systems that grind seeds without generating excess heat. At home, you replicate that principle by keeping your grinding sessions short and giving the equipment rest periods between batches.
Common Grinding Mistakes to Avoid
Even with the right timing, a few errors can undermine your results. Here is what to watch for:
- Overloading the grinder: Filling past 3 tablespoons creates a traffic jam. Seeds at the top stay whole while seeds at the bottom turn to dust. The result is an unusable mix of powder and intact seeds.
- Skipping the shake: Seeds naturally settle unevenly during grinding. That quick shake between pulses redistributes material so every seed gets equal blade contact. Skip it, and you get inconsistent particle size.
- Running the motor too long: Most small electric grinders are designed for bursts, not sustained operation. Running continuously for more than 30 seconds risks overheating the motor and can generate enough friction heat to noticeably reduce the potency of your powder. If the grinder housing feels warm to the touch, stop and let it cool for a full minute before continuing.
- Grinding hot seeds: If you toasted your seeds in the previous step, let them cool completely to room temperature before grinding. Hot seeds release steam inside the grinder, creating clumps and an uneven paste instead of dry powder.
- Checking too frequently: Every time you open the lid, you lose some of the fine powder that has become airborne inside the cup. Limit your checks to the natural pause points described above.
How do you make mustard powder that stays potent batch after batch? Treat each small load as its own mini-project. Grind it, empty it into a bowl, then start the next batch fresh. Combining multiple small batches at the end gives you a larger quantity with far more consistent texture than trying to grind everything at once.
Once your seeds are ground, the powder likely contains a mix of particle sizes: some ultra-fine, some coarser hull fragments that resisted the blade or pestle. Separating these through sifting is what takes your homemade powder from good to genuinely refined.
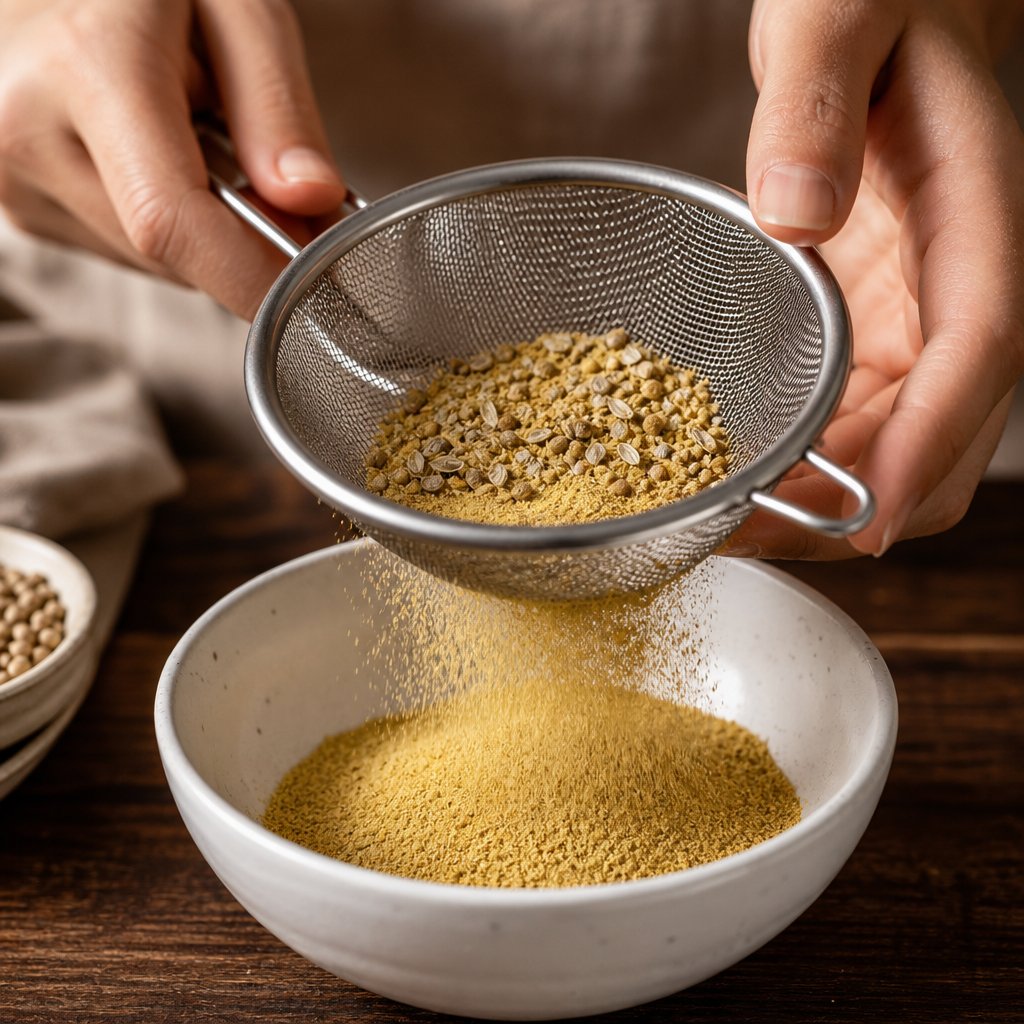
Step 5 Sift and Create Custom Powder Blends
Your freshly ground powder is not a single, uniform product yet. Look closely and you will see a mix of textures: silky fine particles alongside stubborn hull fragments and partially crushed seed pieces that escaped the blade. Sifting separates these into usable grades, and it takes less than a minute to do. As Lifehacker points out, running ground spices through a fine-mesh sieve adds about 30 seconds to the process and noticeably improves the final texture.
Single and Double Sifting Techniques
The basic method is straightforward. Hold a fine-mesh strainer over a clean bowl and spoon your ground powder into it. Tap the rim gently with your hand or a spoon, letting gravity pull the fine particles through while the coarser hull fragments stay behind. Avoid pressing or forcing material through the mesh, as that pushes oversized pieces into your finished powder and defeats the purpose.
Collect the coarse material left in the sieve and return it to your grinder for another pass. One re-grind usually converts most of the remaining fragments into usable powder. Any stubborn hull pieces that survive a second grind can be discarded or saved for pickling brines where texture is welcome.
For ultra-fine powder that matches commercial quality, use a double-sifting method. Run your powder through a standard fine-mesh strainer first, then pass the sifted result through an even finer sieve (a tea strainer or flour sifter works well). This two-stage approach produces powder in the 30 to 40 mesh range, fine enough for smooth sauces, batters, and baking where any grittiness would be noticeable. A practical tip: sift onto a sheet of parchment paper rather than directly into a jar. The wide surface catches stray particles, and you can fold the paper to funnel everything neatly into your storage container.
When does sifting actually matter? It depends on the application. Smooth cheese sauces, salad dressings, baked goods, and cosmetic preparations demand fine, uniform powder. Coarse fragments in a vinaigrette create an unpleasant gritty mouthfeel, and lumpy powder in bread dough produces uneven flavor pockets. On the other hand, dry rubs, pickling spice blends, and rustic mustard recipes benefit from a coarser, more textured grind. For those uses, a single quick sift to remove only the largest pieces is plenty.
Blending Seed Varieties for Custom Flavor Profiles
Here is where making your own powder gets genuinely exciting. The sifting stage is the perfect moment to blend different mustards into custom combinations. You have already ground each variety separately (which ensures even particle size per type), and now you can mix them in precise ratios to build flavor profiles that no single-variety powder can deliver.
Think of it like mixing paint. Yellow seeds bring mild tanginess and bright color. Brown seeds contribute earthy heat and depth. Black seeds add sharp, aggressive pungency. By adjusting the proportions, you create mustard ingredients tailored to specific cooking styles. The ingredients in mustard powder are simply seeds, but the ratio between varieties transforms the character entirely.
Here are suggested blend ratios for different applications:
- Mild all-purpose blend (great for baking and everyday cooking): 80% yellow seeds, 20% brown seeds. Produces a versatile powder with gentle warmth and a classic mustard flavor that works in recipes with mustard as a background note.
- Medium-heat cooking blend (ideal for sauces, marinades, and dressings): 70% yellow seeds, 30% brown seeds. Delivers noticeable heat without overwhelming other flavors. This ratio works beautifully in mustard recipes that call for balanced complexity.
- Hot condiment-grade blend (for prepared mustard and bold dishes): 50% brown seeds, 30% black seeds, 20% yellow seeds. Produces a powder with serious bite and layered depth. Use this in recipes with mustard as the star ingredient, like hot table mustard or spicy glazes.
- Indian-inspired blend (for curries and tempering): 60% black seeds, 40% brown seeds. Maximum pungency with earthy undertones, designed for mustard in recipes where it needs to stand up against other bold spices.
Mix your blends thoroughly after combining. A small whisk or a sealed jar shaken vigorously for 15 to 20 seconds distributes the different powders evenly. Label each blend with its ratio and date so you can reproduce favorites or adjust proportions next time.
The beauty of custom blending is that you can fine-tune over time. Start with the ratios above, use them in your cooking, and shift the percentages based on what your palate tells you. A 70/30 yellow-to-brown blend too mild for your taste? Move to 60/40 next batch. This iterative approach is something no store-bought powder allows, and it turns your spice cabinet into a genuinely personalized toolkit.
With your powder sifted, blended, and ready to use, the next priority is keeping it at peak potency. Storage conditions determine whether your carefully crafted powder stays vibrant for months or fades to a shadow of itself within weeks.
Step 6 Store Your Mustard Powder for Maximum Freshness
You just spent time selecting seeds, grinding carefully, and sifting to perfection. It would be a shame to watch all that effort fade because of a poor storage choice. The volatile oils that give your dried mustard powder its heat and aroma are the same compounds that make it fragile. Exposure to air, light, heat, and moisture accelerates their breakdown. The right container and environment can mean the difference between powder that stays sharp for a year and powder that tastes flat within a few weeks.
Best Containers for Preserving Potency
Container choice matters more than most people expect. Those volatile isothiocyanates are lipophilic, meaning they bond readily with certain materials. Plastic containers, even food-grade ones, can absorb these essential oils over time, slowly pulling flavor and heat out of your powder and into the container walls. You will not see it happening, but you will taste the difference after a few months.
The best options for storing homemade mustard powder:
- Amber or dark glass jars with airtight lids: Glass is inert and will not absorb volatile oils. Dark glass blocks light, which degrades both color and potency. Small canning jars or repurposed spice jars with rubber-sealed lids work perfectly.
- Small metal tins with tight-fitting lids: Tin and stainless steel are non-reactive and block light completely. They are lightweight and stackable, making them practical for a spice drawer or cabinet.
- Vacuum-sealed bags: For larger batches you plan to store long-term, vacuum sealing removes nearly all oxygen from the equation. This dramatically slows oxidation and can extend peak potency by several months. A vacuum sealer with a jar attachment lets you seal powder directly in glass jars, combining the benefits of both methods.
Avoid clear glass unless you store it inside a dark cabinet. Avoid plastic bags, plastic containers, and any vessel that does not seal airtight. Even a loose-fitting lid allows enough air exchange to dull your powder over weeks.
Shelf Life and Signs of Degradation
Properly stored homemade mustard powder retains peak potency for 6 to 12 months. After that window, it remains usable for up to 2 years, but you will notice a gradual decline in heat and aroma. The powder does not become unsafe to eat; it simply becomes less effective. As Eurofins notes in their shelf life research, oxidation of essential oils is the primary driver of flavor loss in ground spices, and airtight packaging is the single most effective countermeasure.
Whole spices store far longer than ground versions because the intact seed hull acts as a natural barrier. This is exactly why grinding your own in small batches outperforms buying pre-ground: you control when that protective barrier gets broken.
How do you know when your powder is past its prime? Watch for these signs:
- Faded color: Fresh yellow mustard powder has a vibrant, saturated yellow mustard color. As it ages, it shifts toward a dull, washed-out tan. Brown and black seed powders lose their rich depth and turn grayish.
- Reduced aroma: Open the jar and sniff. Fresh powder hits you immediately with a sharp, peppery scent. If you have to bring the jar to your nose and concentrate to detect anything, potency has dropped significantly.
- Diminished heat: Taste a tiny pinch on your tongue. Fresh powder produces a quick, building burn. Aged powder feels flat and merely bitter without the characteristic sting.
- Clumping or caking: Moisture has entered the container. Clumped powder may still be usable if it smells fine, but the moisture exposure has likely accelerated degradation.
A practical rule of thumb: if your organic mustard powder or any homemade batch fails two of these four checks, it is time to grind a fresh supply. The old powder can still go into large-batch cooking like soups or brines where subtlety is less critical, but it should not be your go-to for finishing dishes or making condiments.
Batch Sizing and Labeling Tips
The smartest storage strategy is grinding only what you will realistically use within that 6 to 12 month peak window. For most home cooks, that means small batches of 3 to 4 tablespoons at a time rather than filling a large jar that gets opened repeatedly over many months.
Every time you open a container, you introduce fresh oxygen and potentially moisture from the air. Smaller containers mean less headspace (the air gap above the powder) and fewer opening cycles before the contents are used up. If you grind a larger quantity, split it across multiple small jars. Use one as your active cooking jar and keep the others sealed until needed.
Labeling sounds basic, but it is the habit that separates organized spice cabinets from chaotic ones. Write the following on each container:
- Seed variety or blend ratio (e.g., "70/30 yellow-brown")
- Grind date
- Whether seeds were toasted or raw
- Grind fineness (coarse, medium, fine)
This information takes five seconds to jot down and saves you from guessing six months later when you pull a jar from the back of the cabinet.
Here is a quick reference for storage best practices:
- Do: Store in a cool, dark, dry location away from the stove, oven, or dishwasher (all heat sources)
- Do: Keep containers tightly sealed between uses
- Do: Use small containers to minimize air exposure per opening
- Do: Vacuum seal larger batches intended for long-term storage
- Don't: Store above or next to the stove where heat and steam concentrate
- Don't: Use plastic containers that absorb volatile oils
- Don't: Leave jars in direct sunlight or under bright kitchen lighting
- Don't: Scoop with wet or damp spoons, which introduce moisture into the jar
A spice cabinet mounted on an interior wall, away from windows and cooking heat, is the ideal home for your dried mustard powder. A pantry shelf or a drawer also works well. The freezer is an option for very long-term storage, but only if the powder is vacuum-sealed first. Without that seal, condensation forms each time you remove the container from the freezer, introducing the moisture you are trying to avoid.
With your powder stored properly and labeled clearly, the real fun begins: putting it to work. Homemade mustard powder is far more versatile than most people realize, reaching well beyond the obvious condiment applications into baking, emulsification, wellness, and even commercial product development.

Step 7 Put Your Mustard Powder to Work
A jar of freshly ground mustard powder sitting untouched in your cabinet is wasted potential. This ingredient does far more than become a condiment. It functions as a seasoning, an emulsifier, a leavening aid, and even a wellness tool. Once you understand the range of applications, you will find yourself reaching for it almost daily.
Cooking and Baking Applications
Mustard powder earns its place in the kitchen through sheer versatility. Here is where it shines:
- Culinary uses: Dry rubs for pork, beef, and chicken. Marinades where the powder tenderizes while flavoring. Salad dressings and vinaigrettes. Cheese sauces (especially Welsh rarebit and mac and cheese). Curry powder blends. Pickling spice mixtures.
- Baking uses: Soft pretzels, cheese crackers, savory breads, and beer-cheese dips. A teaspoon of mustard powder in cheddar biscuit dough adds a subtle warmth that makes the cheese flavor pop without tasting like mustard.
- Emulsification: Mustard powder contains mucilage, a natural compound that helps oil and water-based liquids stay blended. Add half a teaspoon to any vinaigrette and it holds together far longer than one made without it. This same property makes it invaluable in a mustard sauce recipe where you need a smooth, stable consistency without separation.
A simple mustard powder recipe for an everyday vinaigrette: whisk together one teaspoon of your powder, two tablespoons of vinegar, a pinch of salt, and six tablespoons of olive oil. The powder acts as the glue that keeps the emulsion stable for hours instead of minutes.
Making Prepared Mustard From Your Powder
Knowing how to make mustard from mustard powder opens up an entire category of condiments. The basic prepared mustard recipe is almost absurdly simple: mix your powder with a cold liquid, then wait.
Here is how to prepare mustard at home:
- Combine 3 tablespoons of mustard powder with 2 tablespoons of cold water, white wine, or beer. Stir into a smooth paste.
- Let the paste rest for 10 to 15 minutes at room temperature. This waiting period is essential. The myrosinase enzyme needs time to convert glucosinolates into the isothiocyanates that produce heat.
- After resting, stir in a pinch of salt and a splash of vinegar or lemon juice. The acid stabilizes the heat at its current level, preventing further development.
- Adjust consistency with small additions of liquid until you reach your preferred thickness.
This basic homemade mustard recipe adapts endlessly. Use white wine for a Dijon-style result. Use beer for a grainy pub mustard. Add honey for a sweet-hot glaze. Use rice vinegar for an Asian-inspired dipping sauce. Each variation starts from the same powder you ground yourself, which means the flavor depth is leagues beyond anything made from stale commercial powder.
As Leite's Culinaria notes, the freshly mixed mustard will taste aggressively pungent at first. Give it a few days in the refrigerator to mellow, and the sharp edges round into a balanced, complex condiment. The type of powder you use determines the character: yellow for classic American-style, brown for spicy Dijon, or a blend for something uniquely yours.
You can also make mustard from powder in larger batches for gifting or pantry stocking. A mustard recipe with mustard powder scales linearly, so doubling or tripling the quantities works without any ratio adjustments.
Wellness Applications
Beyond the kitchen, mustard powder has a long history in home wellness practices:
- Mustard foot baths: A 2020 study found that soaking feet in warm water with 3 tablespoons of ground black mustard seed powder daily for 6 days improved participants' perceptions of warmth and general wellness. The glucosinolates in mustard may have antibacterial and anti-inflammatory properties that contribute to these effects.
- Mustard poultices: A traditional remedy for chest congestion, made by mixing mustard powder with flour and warm water, then wrapping in cloth and applying to the chest. The warming sensation stimulates circulation in the area.
- Bath soaks: Adding a quarter cup of mustard powder to a full bath creates a warming soak that many people find soothing for sore muscles after exercise.
A word of caution: mustard powder can irritate sensitive skin. Always test a small area first, and never apply directly to broken skin.
Scaling From Kitchen to Commercial Production
The growing market for functional foods and natural health products has created real opportunity for mustard-based products. If your homemade experiments have produced a blend or formulation worth sharing beyond your own kitchen, the path from recipe to retail product is more accessible than you might think.
For brands, supplement importers, or private label sellers looking to turn a proven mustard powder recipe into a commercial product, contract manufacturers specializing in powder and granule formats can handle the transition. ZhuFeng's OEM/ODM health food manufacturing services offer customized formulation and scalable production across flexible product formats, including powders and granules. Their capabilities allow entrepreneurs to move from a kitchen-tested blend to market-ready packaging without building their own production facility.
Whether your goal is a signature spice blend, a functional mustard supplement, or a private-label condiment powder, partnering with an experienced manufacturer lets you focus on recipe development and branding while they handle compliance, consistency, and volume.
Step 8 Troubleshoot Common Issues and Substitutions
Even with solid technique, things occasionally go sideways. Maybe your powder came out gritty when you needed it silky. Maybe it tastes flat when you expected fire. These problems are fixable, and most trace back to a single variable you can adjust on your next batch. Below is a quick-reference guide covering the most frequent issues home grinders encounter, along with the substitution ratios you will need when swapping between powder and prepared mustard in recipes.
Fixing Common Grinding Problems
When your results do not match expectations, resist the urge to blame the seeds. Nine times out of ten, the issue is process-related. Here is a diagnostic table to help you pinpoint the cause and correct it fast:
| Problem | Likely Cause | Solution |
|---|---|---|
| Powder not fine enough | Batch too large for the grinder; seeds not redistributed between pulses | Reduce batch size to 2 tablespoons max. Use the pulse method with shaking between bursts. Sift and re-grind the coarse remnants for a second pass. |
| Powder lacks heat | Seeds are old or stale; over-toasting destroyed enzymes; prolonged grinding generated excess heat | Source fresher seeds with a recent harvest date. Grind raw instead of toasting. Use short pulse bursts to minimize friction heat. |
| Powder tastes bitter | Seeds were over-toasted (burnt); seeds are past their prime and have oxidized | Toast more lightly (remove from heat at the first pop, not after). Try a fully raw grind. Discard old seeds and start with a fresh batch. |
| Grinder motor overheating | Continuous grinding without rest periods; batch too large creating excessive resistance | Work in 5-second bursts with 10-second rest periods between them. Reduce batch size. If the housing feels warm, stop for a full minute before resuming. |
| Uneven grind (mix of fine and coarse) | Seeds not redistributed during grinding; grinder overloaded so blades cannot reach all material | Shake the grinder cup between every 2 to 3 pulses. Cut batch size in half. Sift the result and re-grind only the coarse fraction separately. |
A pattern emerges across nearly every problem: smaller batches and shorter grinding intervals solve most issues. If you remember nothing else from this troubleshooting section, remember that. Overloading and over-grinding are the two most common mistakes, and both have the same fix: less material, less time, more patience.
One additional issue worth mentioning: if your powder clumps immediately after grinding, the seeds likely retained moisture. This happens when toasted seeds are ground before cooling completely, or when seeds were stored in a humid environment. Spread the powder on a parchment-lined tray and let it air-dry for 30 minutes before jarring. If clumping persists, your seeds may need to be replaced with a drier batch.
Substitution Ratios for Mustard Powder
Recipes do not always align with what you have on hand. Maybe you ground a beautiful batch of powder last week but the recipe calls for prepared yellow mustard. Or maybe you ran out of powder mid-cooking and need a quick workaround. Knowing the correct ratios keeps your dish on track without a trip to the store.
The key ratio to memorize: 1 teaspoon of dry mustard powder equals approximately 1 tablespoon of prepared mustard. This 1:3 relationship exists because prepared mustard contains added liquid (water, vinegar, or wine), plus other ingredients like salt and turmeric that dilute the mustard concentration. The Spruce Eats confirms this standard substitution, noting that you will also need to add about 2 teaspoons of liquid (a mix of water and vinegar works well) for each teaspoon of dry mustard to compensate for the missing moisture.
Here is how the substitutions break down in practice:
- To substitute dried mustard for prepared mustard: Use 1 teaspoon of powder plus 2 teaspoons of liquid (1 teaspoon water and 1 teaspoon vinegar) for every 1 tablespoon of prepared mustard the recipe requires. Let the mixture sit for 10 minutes before adding it to your dish so the heat compounds can develop.
- To use prepared mustard as a mustard powder substitute: Use 1 tablespoon of prepared mustard for every 1 teaspoon of powder called for. Reduce other liquids in the recipe slightly to account for the added moisture. This works as a reliable sub for mustard powder in most savory applications.
- Homemade powder as a ground mustard substitute: Your homemade powder replaces commercial ground mustard at a straight 1:1 ratio. No adjustment needed. In fact, because your powder is fresher, you may find you can use slightly less and still achieve the same flavor impact.
What about a dried mustard alternative when you have neither powder nor prepared mustard? Horseradish or wasabi powder can stand in for the heat component, though neither replicates mustard's specific flavor. Use half the amount called for and taste as you go. Turmeric mimics the color but contributes almost no heat, so it works only when appearance matters more than flavor.
A few practical notes on substitutions: the dry mustard substitute ratio works best in cooked dishes like sauces, casseroles, and marinades where the powder has time to hydrate and bloom. In cold applications like a dry rub or spice blend, there is no true sub for ground mustard in powder form. You need the dry ingredient itself, so keep a small jar on hand or grind a fresh tablespoon from whole seeds in under a minute.
Your homemade mustard powder is a more potent, more versatile ingredient than anything you will find pre-ground on a shelf. When problems arise, they are almost always technique issues with simple fixes. And when a recipe calls for a format you do not have, the substitution math is straightforward enough to do in your head. That flexibility, combined with the superior flavor of freshly ground seeds, is exactly why the small effort of making your own pays off every time you cook.
Frequently Asked Questions About Making Mustard Powder
1. Is ground mustard the same as mustard powder?
Yes, ground mustard, mustard powder, and dry mustard are all the same product. They all refer to whole mustard seeds that have been milled into a fine powder. Different brands and recipe authors use different names, but they are interchangeable at a 1:1 ratio in any recipe.
2. How long does homemade mustard powder last?
Homemade mustard powder retains peak potency for 6 to 12 months when stored in airtight dark glass jars or metal tins in a cool, dry location away from heat sources. It remains usable for up to 2 years, though heat and aroma gradually diminish. Signs of degradation include faded color, reduced aroma when the jar is opened, and less heat when tasted.
3. What equipment do I need to grind mustard seeds into powder?
An electric blade spice grinder (typically $20 to $40) handles most home grinding needs, producing fine, consistent powder in under 30 seconds per batch. A mortar and pestle works well for small batches of 1 to 2 tablespoons when you want control over texture. High-speed blenders and food processors can handle larger quantities but often produce uneven results that require sifting and multiple passes.
4. Can I substitute mustard powder for prepared mustard in recipes?
Yes. Use 1 teaspoon of dry mustard powder plus 2 teaspoons of liquid (1 teaspoon water and 1 teaspoon vinegar) to replace 1 tablespoon of prepared mustard. Let the mixture sit for 10 minutes before adding it to your dish so the heat compounds develop. Conversely, use 1 tablespoon of prepared mustard to replace 1 teaspoon of powder, reducing other liquids slightly to compensate.
5. Should I toast mustard seeds before grinding them into powder?
It depends on your intended use. Raw grinding preserves maximum heat and sharp pungency, making it ideal for hot mustard condiments and recipes where you want bold bite. Toasting in a dry skillet for 1 to 2 minutes mellows the heat while developing nutty, warm flavors suited for dry rubs, baking, and milder preparations. A light toast of 30 to 45 seconds offers a middle ground with moderate heat and subtle depth.