
Understanding Disclosing Tablets and How They Work
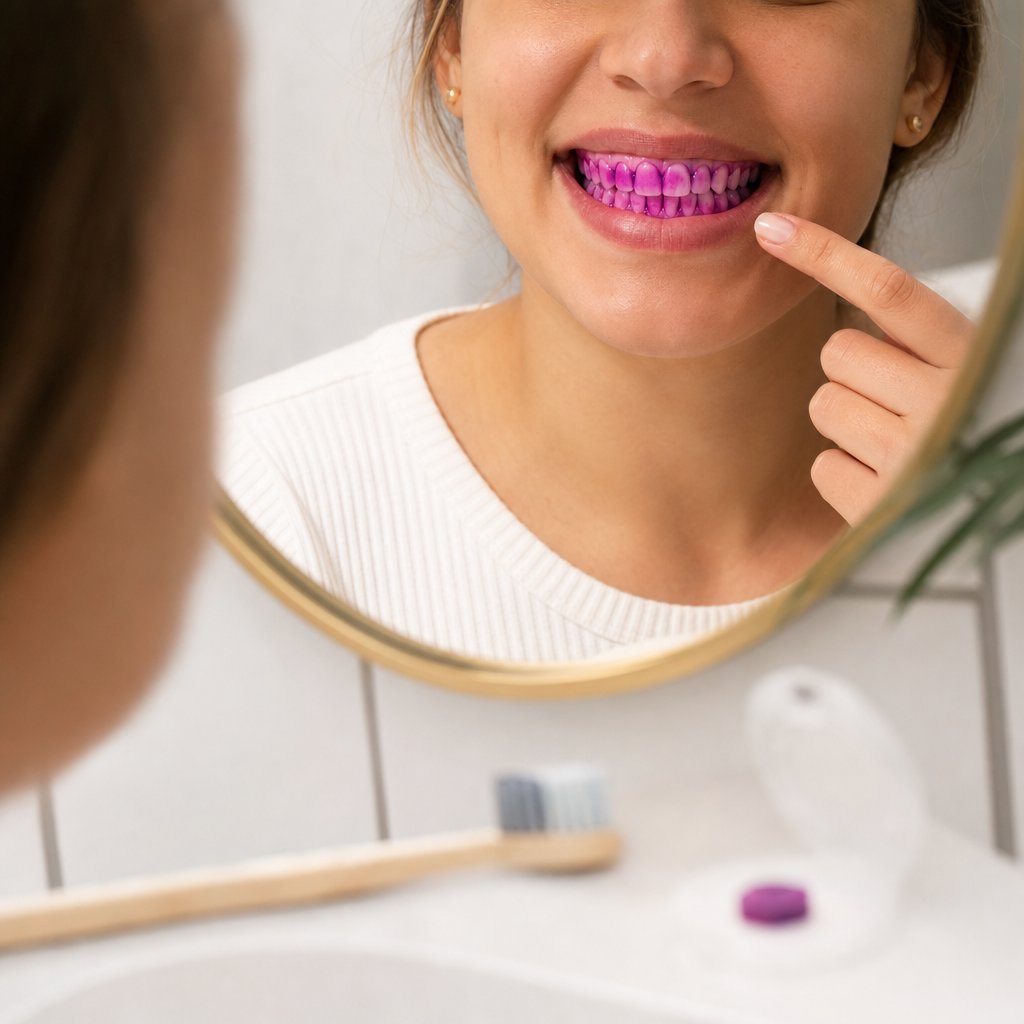
You brush twice a day, floss when you remember, and your teeth look clean in the mirror. But what if invisible layers of bacteria are hiding in plain sight? That is exactly the problem disclosing tablets solve. These small chewable tablets use food-grade vegetable dyes to stain dental plaque a vivid color, turning an invisible threat into something you can actually see and target.
What Are Disclosing Tablets
So what is a disclosing tablet, exactly? It is a small, dissolvable tablet containing a safe dye, most commonly erythrosine (FD&C Red No. 3) or phloxine B. When you chew the tablet and swish the colored saliva around your mouth, the dye clings to areas where plaque biofilm has accumulated while washing cleanly off smooth, plaque-free enamel. The result is a color-coded map of every spot your toothbrush missed.
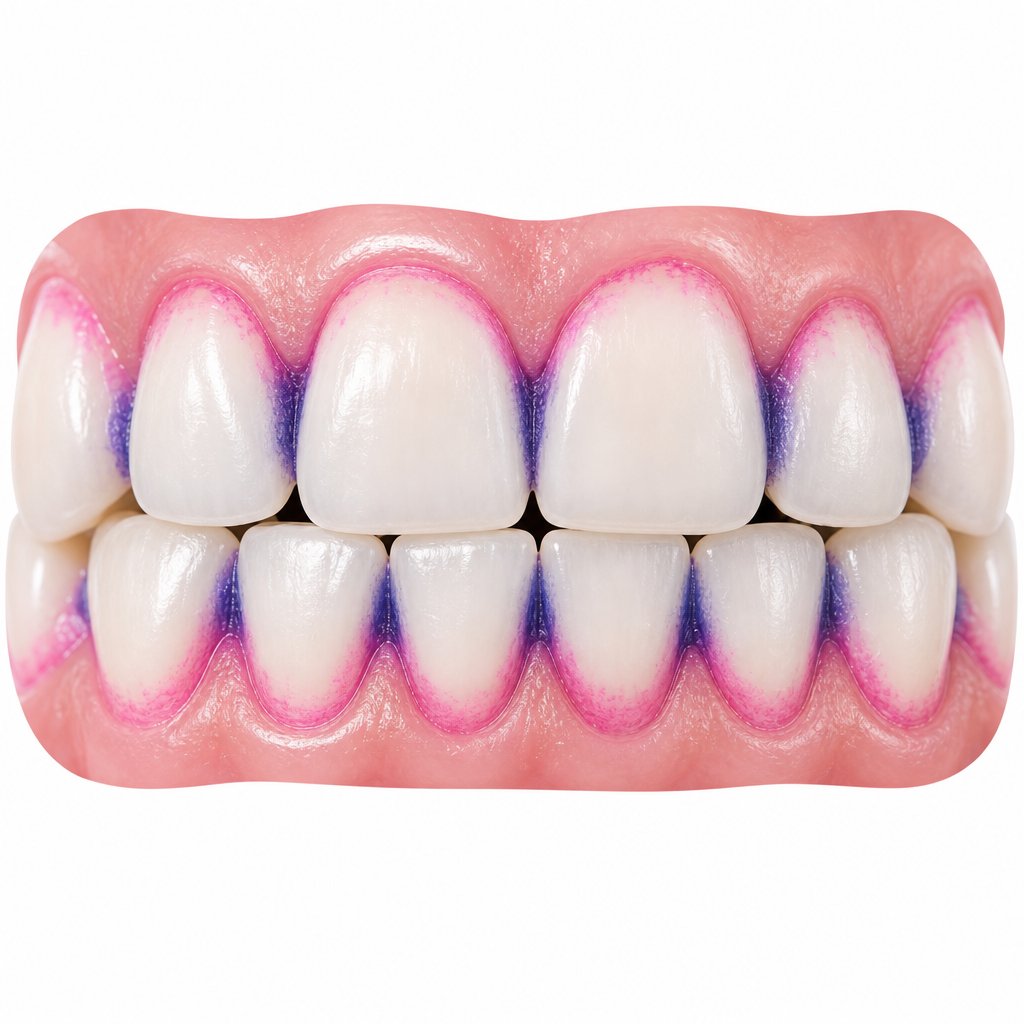
Plaque disclosing tablets come in two main varieties. Single-tone formulas stain all plaque one uniform color, typically pink or red. Two-tone versions use a combination of dyes to differentiate newer plaque (pink/red) from older, more established deposits (blue/purple). Dentists and hygienists have relied on these tablets for decades as a patient education tool, helping people visualize exactly where their brushing technique falls short. A case report published in Cureus demonstrated that repeated use of plaque-disclosing agents alongside brushing instruction led to progressive reductions in both plaque and gingival inflammation over just four weeks.
How the Dye Binds to Plaque Biofilm
You might wonder why the dye sticks to some areas but rinses right off others. The answer lies in the structure of dental plaque itself. Plaque is not just a random smear of bacteria. It is an organized biofilm, a three-dimensional community of microorganisms embedded in a sticky matrix of proteins, polysaccharides, and glycoproteins.
The protein matrix within plaque biofilm acts like a molecular sponge, attracting and trapping dye molecules through electrostatic and hydrophobic interactions. Clean enamel, by contrast, presents a smooth, low-energy surface that lets the dye slide away with a simple rinse.
This selective binding is what makes disclosing so reliable. Research confirms that erythrosine readily stains bacterial biofilm on tooth surfaces, a property that dental professionals also leverage in antimicrobial photodynamic therapy protocols where the dye is used to identify and target plaque bacteria. For everyday home use, though, the principle is simpler: wherever you see color after chewing the tablet, plaque is present and your brushing routine needs adjustment.
Understanding how to use disclosing tablets starts with grasping this basic science. The dye does not lie, and it does not discriminate. It reveals every overlooked crevice, every rushed stroke, and every habitual blind spot. The real question becomes: what do you need before you get started?
Step 1 - Gather Your Supplies and Protect Against Staining
A little preparation goes a long way here. Dental disclosing tablets contain dyes that cling to more than just plaque, so setting up properly saves you from scrubbing pink splotches off your bathroom counter later. Gather everything in one spot before you begin.
Essential Supplies You Will Need
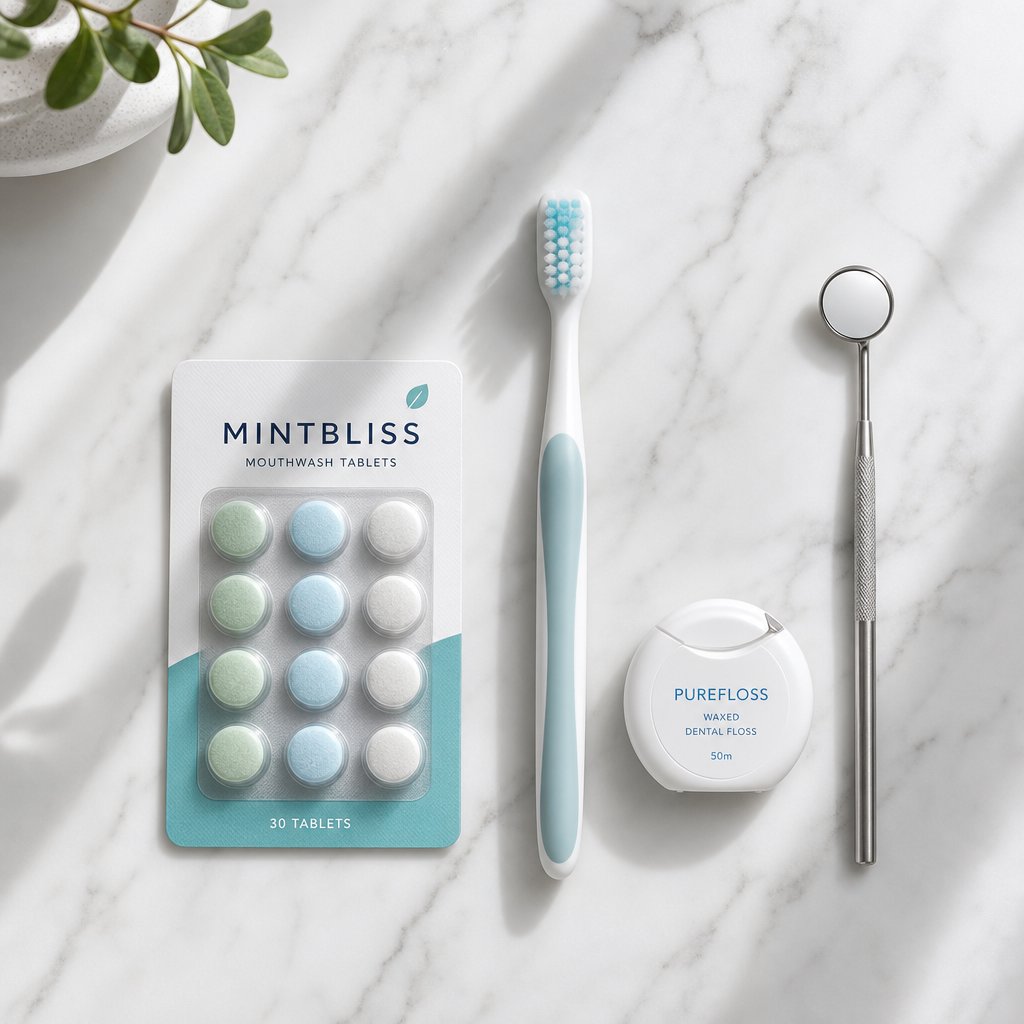
Keep it simple. Here is what you need within arm's reach:
- One disclosing tablet (or disclosing solution if you prefer a liquid format)
- Your regular toothbrush and toothpaste
- Dental floss or interdental brushes
- A well-lit bathroom mirror
- A cup of water for rinsing
- A small hand mirror or phone camera for viewing hard-to-reach areas
- Paper towels for quick cleanup
One critical step before you reach for the tablet: brush and floss your teeth thoroughly first. This might sound counterintuitive, but the goal is to reveal plaque your current technique misses, not plaque you simply have not gotten to yet. Brushing first turns the exercise into an honest audit of your habits rather than a test of whether you remembered to clean your teeth today.
Protecting Against Temporary Staining
Disclosing tablets for teeth are perfectly safe, but the dye does not discriminate between plaque and your favorite white towel. The tablets may cause temporary pink coloring of lips and cheeks, and your tongue will likely turn red for a few hours. Dentists suggest using them at night so the color fades by morning.
A few precautions make the process mess-free:
- Lips and skin: Apply a thin layer of petroleum jelly to your lips and the skin around your mouth before chewing. The barrier prevents dye from absorbing into soft tissue. This same trick appears in DIY disclosing methods recommended by dental clinics.
- Clothing: Wear an old shirt or drape a dark towel over your chest. Tooth disclosing tablets produce vivid red or pink saliva that spatters easily during the swish-and-spit phase.
- Surfaces: Lay paper towels around the sink basin. Wipe any splashes immediately since the dye lifts easily when fresh but can set on porous grout or fabric.
- Tongue and cheeks: Gentle brushing with your toothbrush after the session removes most residual color. A tongue scraper speeds this up considerably.
Think of this prep as a two-minute investment that keeps your focus on what matters: the plaque patterns about to appear on your teeth. With your supplies ready and staining risks handled, the next move is getting that dye onto every tooth surface evenly.

Step 2 - Chew the Tablet and Coat Every Tooth Surface
Getting even dye coverage across all your teeth is the difference between useful feedback and a patchy, misleading result. The chewing phase sounds straightforward, but a few details in timing and technique determine whether the dye reaches every nook or misses the spots that matter most.
Proper Chewing Technique for Full Coverage
Place one disclosing tablet between your back molars and crush it with a few firm bites. You will notice a slightly chalky texture as the tablet breaks apart, followed by a mildly sweet or berry-like taste depending on the brand. The flavor is not unpleasant, but it is distinctive enough that you will know the dye is releasing.
Here is the step-by-step process for chewing disclosing tablets effectively:
- Crush the tablet between your back teeth. Two or three firm bites are enough to break it into small fragments. Do not swallow any of the material.
- Continue chewing for about 30 seconds. This mixes the dye thoroughly with your saliva, creating a colored solution that can flow into every gap and groove.
- Use your tongue actively. As you chew, press your tongue against the front, back, and biting surfaces of each tooth. The Leeds Teaching Hospitals NHS Trust recommends using your tongue to coat all teeth and keeping the mixture in your mouth for up to one minute to ensure full coverage.
- Work the solution along the gumline. Tilt your head slightly and let the liquid pool near the gum margins where plaque tends to accumulate most heavily.
- Check that all teeth feel coated. Run your tongue across every surface. If any area feels dry or uncoated, direct more of the colored saliva there before moving on.
The goal is simple: every square millimeter of tooth surface should contact the dye. Rushing this step or swallowing too early leaves blind spots in your results, which defeats the entire purpose of the exercise.
Adapting the Method for Children
Kids benefit enormously from seeing plaque on their teeth. It turns an abstract concept into something visible and even a little fun. But the approach needs adjusting based on age and ability.
Children under 6: Young children may struggle with the chewing-and-not-swallowing coordination. A safer approach is for a parent to crush the disclosing tablet between two spoons, mix the powder with a few drops of water, and paint the resulting paste onto the child's teeth using a cotton swab. This gives full control over where the dye goes without any swallowing risk. Focus on the front teeth and the areas the child can see in the mirror, since the visual payoff is what builds better habits.
Children ages 6 to 12: Most kids in this range can chew a tablet normally with supervision. Have them lean over the sink and remind them to spit rather than swallow. Make it a game: challenge them to find every pink spot and brush it away. The competitive element keeps them engaged far longer than a lecture about plaque ever would.
Teens and adults: Standard chewing technique works perfectly. No modifications needed beyond the staining precautions covered earlier.
For anyone who dislikes the chewing texture or has difficulty with tablets, a liquid plaque disclosing solution offers an alternative. These products work identically. You simply swish a few drops of the dental plaque disclosing solution around your mouth for 30 seconds instead of chewing. The trade-off is slightly less precision in hard-to-reach areas, since the mechanical action of chewing helps push dye into tight interproximal spaces. Still, a disclosing solution is a solid choice for very young children, elderly users, or anyone with dental appliances that make chewing awkward.
With every tooth surface coated in dye, the next critical move is distributing that color evenly and then knowing exactly how much to rinse away without erasing the evidence you need.
Step 3 - Swish Gently and Examine Your Teeth in the Mirror
The dye is mixed, your teeth feel coated, and your mouth is full of brightly colored saliva. This is the moment where technique matters most. How you swish, spit, and rinse determines whether the plaque reveal tablets do their job or whether you accidentally wash away the very evidence you are trying to find.
Swish and Spit Without Over-Rinsing
Swish the colored saliva around your entire mouth for 10 to 15 seconds. Push the liquid between your teeth, roll it along the gumline, and let it reach behind your back molars. Think of it as a final pass to ensure the dye contacts every surface the chewing phase might have missed.
Then lean over the sink and spit out the excess. Here is where most people make a mistake: they rinse too aggressively. A vigorous swish with water strips the dye from plaque deposits, leaving you with a clean-looking mouth and zero useful information.
Instead, take a small sip of water and rinse once, gently. The Leeds Teaching Hospitals NHS Trust advises patients to spit out and rinse the mouth gently to remove only the extra color. You want to clear the free-floating dye from your saliva while leaving the stain intact on any plaque biofilm. One soft rinse accomplishes this. If the water you spit out is still deeply colored, that is fine. Resist the urge to rinse again.
The logic is straightforward: dye bound to plaque is held in place by the sticky protein matrix of the biofilm. A gentle rinse cannot dislodge it. But dye sitting loosely on clean enamel washes away easily. This difference is exactly what makes the tablets show plaque on teeth so clearly. You just need to trust the chemistry and keep your rinsing minimal.
How to Examine Hard-to-See Areas
Stand in front of a well-lit bathroom mirror and smile wide. The obvious stained areas on your front teeth will jump out immediately. But the real blind spots hide in places you rarely look at during a normal brushing session.
Use this approach to examine every zone systematically:
- Front teeth (facial surfaces): Pull your lips back with your fingers to expose the full surface from gumline to biting edge. Look for color concentrated along the margins where tooth meets gum.
- Molars and premolars: Use a finger to pull your cheek outward on each side. Tilt your head slightly toward the light source so you can see the outer surfaces of your back teeth clearly.
- Tongue-side of lower front teeth: This is one of the most commonly missed zones. Open wide, tilt your head back, and use a small hand mirror angled below your lower teeth to see the lingual surfaces. Plaque showing tablets almost always reveal heavy staining here because the tongue-side of lower incisors sits near salivary gland openings where mineral-rich saliva accelerates plaque buildup.
- Behind upper molars: Open your mouth wide and use a hand mirror angled upward to view the palatal surfaces of your upper back teeth. These areas are notoriously difficult to reach with a toothbrush.
- Between teeth (interproximal spaces): Look for thin lines of color between teeth, especially where they sit tightly together. These gaps are where flossing matters most.
A phone camera is surprisingly useful here. Switch to your front-facing camera, open your mouth, and snap a photo of areas you cannot see directly. Zoom in on the image afterward. This trick works especially well for the tongue-side of lower teeth and the far back of upper molars. Some people find it helpful to take photos each time they use plaque tablets so they can compare results over weeks and spot persistent problem zones.
As MedlinePlus notes, any areas where color remains after rinsing indicate spots where brushing and flossing was not sufficient. Those colored patches are your roadmap. They tell you precisely where plaque is accumulating and, more importantly, what those patterns reveal about your brushing habits.
Step 4 - Interpret the Stain Colors and Identify Problem Zones
Colored patches are staring back at you from the mirror. Some are bright pink, others might lean toward deep purple. Each shade carries specific information about how long plaque has been sitting undisturbed and what your brushing routine is failing to address. Knowing how to read these colors transforms a simple dye test into a personalized diagnostic tool.
Single-Tone vs Two-Tone Color Results
If you used standard pink tablets for brushing teeth, every stained area appears the same shade of pink or red regardless of how old the plaque is. This tells you where plaque exists but not how long it has been building up. Single-tone plaque tablets are straightforward and work well for a quick pass-or-fail check of your technique.
A two tone disclosing solution adds another layer of insight. These formulas use two dyes with different molecular sizes. Red dyes like phloxine have larger particles that stain all plaque, including thin, recently formed deposits. Blue dyes like brilliant blue FCF have smaller particles that penetrate only the tight, dense structure of older, accumulated plaque while avoiding the less compact areas of newer biofilm. The result is a color-coded age map of your plaque deposits.
Here is what each color means and how to respond:
| Stain Color | Plaque Age | What It Means | Recommended Action |
|---|---|---|---|
| Pink / Red | Less than 24 hours | Fresh plaque from your most recent missed brushing cycle | Adjust brush angle or spend more time in that zone during your next session |
| Blue / Purple | More than 48 hours | Mature, established biofilm your routine consistently misses | Rework your technique entirely for that area; consider adding an interdental tool |
| Dark blue or violet (advanced formulas) | 72+ hours, often acidic | Highly mature plaque actively producing acids that attack enamel | Prioritize immediate removal and consult your dentist if it persists after correction |
Purple tablets for teeth, or more precisely the blue-purple staining they reveal, should grab your attention. Any area consistently showing blue or violet means your brushing has a structural blind spot, not just an occasional slip. Research from Hiroshima University using a two-tone staining solution confirmed that most plaque in patients receiving regular hygiene care stained red (new), while blue-stained areas were far less common but indicated spots where biofilm had matured undisturbed. That distinction matters because older plaque is denser, more resistant to removal, and more likely to mineralize into tartar.
Some advanced plaque disclosing mouthwash products introduce a third color indicator for acidogenic plaque, biofilm that is actively lowering the local pH and accelerating enamel demineralization. If your product includes this feature, any third-color zones deserve immediate and focused attention.
Common Problem Zones and What They Reveal
Staining rarely appears randomly. It clusters in predictable locations that correspond to specific technique failures. When you examine your results, look for these patterns:
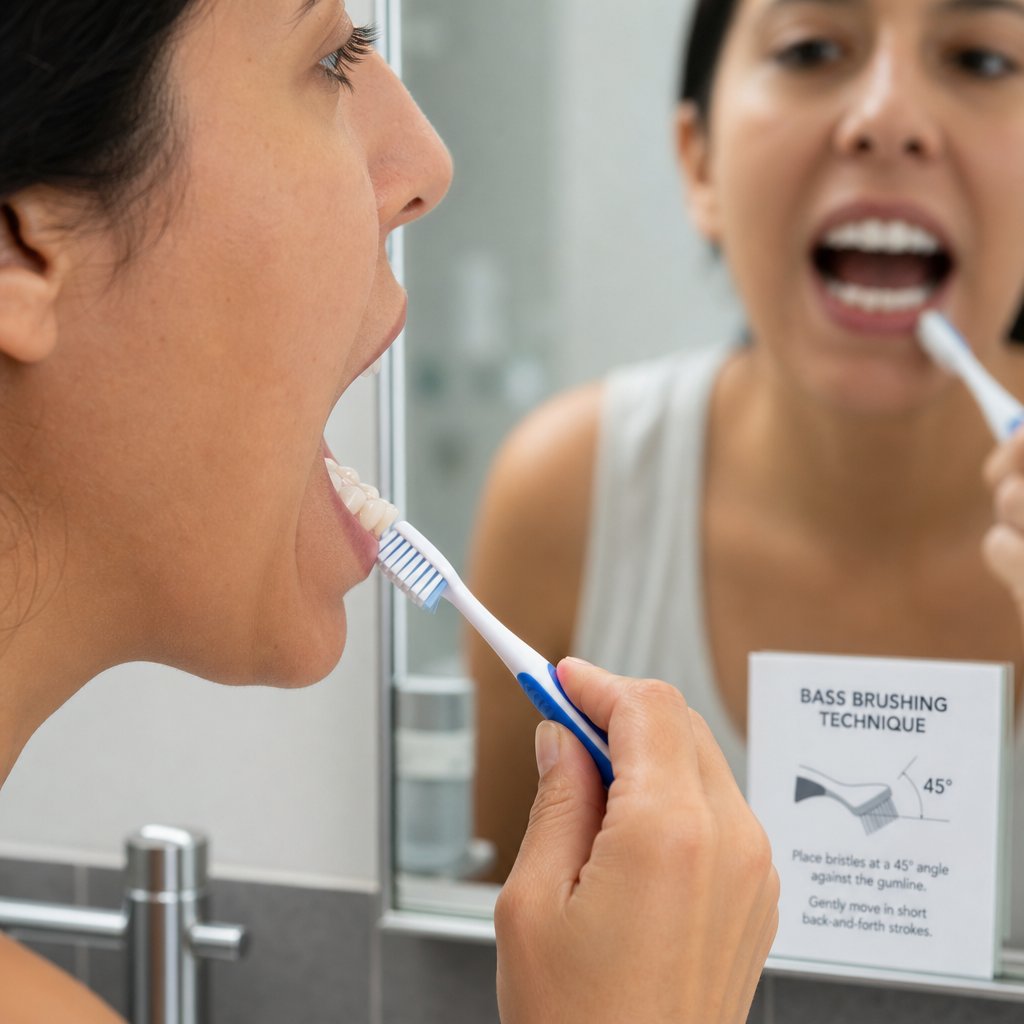
- Along the gumline: A band of color hugging the margin where tooth meets gum indicates your bristles are not angling into the sulcus. You are likely brushing with the toothbrush held flat against the tooth surface rather than tilted at 45 degrees toward the gums. Dentists recommend tilting the brush so bristles reach the natural inward curvatures at the gumline where plaque accumulates most readily.
- Between teeth (interproximal surfaces): Thin lines of pink or purple wedged between teeth mean your toothbrush physically cannot reach those contact points. This is a flossing gap, not a brushing gap. No amount of improved brush technique will solve it without an interdental aid.
- Behind lower front teeth (lingual surfaces): Heavy staining here is extremely common. The tongue-side of lower incisors sits directly above sublingual salivary glands, creating a mineral-rich environment where plaque calcifies quickly. Most people neglect this area because it is hard to see and awkward to reach.
- Biting surfaces of molars: Color trapped in the pits and fissures of your back teeth suggests rushed brushing. These grooves need deliberate, short back-and-forth strokes with the bristle tips pressed into the anatomy of the chewing surface.
- Around orthodontic brackets and wires: Plaque pills and disclosing solutions consistently reveal heavy deposits above and below brackets, in the triangular spaces between the wire and the tooth. Brackets create sheltered zones where standard brushing motions cannot reach without specialized angling.
Each staining pattern points to a specific correction. Gumline color calls for a different brush angle. Interproximal color calls for floss. Lingual color calls for a vertical brushing stroke. The beauty of this system is that it removes guesswork entirely. You are not wondering whether your technique is good enough. The dye has already answered that question. What remains is translating those colored patches into targeted brushing adjustments that eliminate each problem zone one by one.
Step 5 - Brush Away Revealed Plaque with Corrected Technique
Colored patches on your teeth are not just a visual curiosity. They are targets. Each stained zone demands a specific brushing correction, and the goal right now is to remove every trace of dye by applying the right motion, angle, and tool for each problem area. Think of this as real-time feedback: if the color disappears, your technique worked. If it lingers, you need a different approach.
Brushing Techniques for Gumline and Interproximal Plaque
Gumline staining and interproximal color are the two most common findings after using disclosing tablets for plaque. They also require fundamentally different solutions. One is a brushing problem. The other is a flossing problem.
Follow this numbered sequence of corrections to systematically clear each zone:
- Gumline staining: Angle your toothbrush bristles at 45 degrees toward the gum margin. Use short, gentle vibrating strokes rather than long sweeping motions. The Bass brushing technique is specifically designed for this. Press the bristle tips slightly under the gumline and vibrate back and forth 15 to 20 times before moving to the next tooth. This dislodges plaque trapped in the sulcus that flat brushing misses entirely.
- Interproximal staining: Your toothbrush cannot physically reach between tight contact points. Switch to floss or an interdental brush. Curve the floss into a C-shape around each tooth and slide it gently below the gumline. For wider gaps, a small interdental brush cleans more effectively than floss alone.
- Lingual surfaces of lower front teeth: Turn your toothbrush vertically and use the toe of the brush head. Make short up-and-down strokes along the tongue-side of each lower incisor. Dental professionals identify this as one of the four most commonly missed areas during routine brushing.
- Biting surfaces of molars: Hold the brush flat against the chewing surface and use firm, short back-and-forth strokes. Press the bristle tips into the pits and fissures where the dental disclosing agent revealed trapped color.
- Re-check in the mirror: After addressing each zone, examine your teeth again under good light. Any remaining color means that area needs another pass with adjusted pressure or angle.
This process turns teeth brushing tablets into a live training tool. You are not just cleaning your teeth. You are retraining muscle memory so your daily routine eventually covers these spots automatically.
Special Techniques for Orthodontic Patients and Denture Wearers
Brackets, wires, and removable prosthetics create sheltered zones where standard brushing motions fall short. Dental plaque disclosing results in orthodontic patients almost always show heavy staining in the triangular spaces above and below each bracket.
For braces wearers, angle the bristles toward the gumline first, then tilt above and below the brackets to reach both the tooth surface and bracket edges. Use gentle circular motions rather than aggressive horizontal scrubbing, which can loosen brackets or bend wires. An interdental brush slid beneath the archwire cleans the spots your regular brush cannot access.
Denture wearers benefit from plaque disclosing too. Remove the prosthetic, apply a disclosing solution to its tissue-facing surface, and rinse gently. Stained areas reveal biofilm buildup that contributes to oral irritation and bad breath. Brush those zones with a denture brush using the same targeted approach.
Tablets for brushing teeth evaluation work for every mouth configuration. The key is matching the correction to the anatomy. Brackets need angled interdental tools. Dentures need removal and separate cleaning. Retainer wearers should disclose both their teeth and the appliance surface to catch hidden buildup.
Once every colored patch is gone and your mirror check confirms clean surfaces, you have completed one full cycle of plaque disclosing feedback. The real power of brushing teeth tablets, though, is not in a single session. It is in repetition, tracking which zones improve and which stubbornly reappear, building a picture of your habits over time.
Step 6 - Set a Usage Schedule and Track Your Improvement
A single disclosing session reveals your blind spots. Repeated sessions reveal your patterns. The difference between a one-time curiosity and genuine habit change comes down to how consistently you use disclosing dental tablets over weeks and months. Most people try them once, feel motivated for a few days, and then forget. A structured schedule prevents that fade.
So how do you use disclosing tablets for lasting results? The answer depends on where you are in your oral hygiene journey and what you are trying to achieve.
Recommended Frequency for Different Goals
Your ideal usage frequency shifts as your technique improves. Starting heavy and tapering down mirrors how any skill develops: intense practice early, then periodic check-ins to maintain quality. A case report published in Cureus tracked an adolescent patient using plaque-disclosing solutions at baseline, 12 hours, 24 hours, one week, and four weeks. The plaque index dropped from 2.0 to 0.8 over that period, demonstrating that frequent early feedback combined with technique correction produces measurable improvement.
Here is a practical schedule based on user type:
| User Type | Frequency | Duration | Expected Outcome |
|---|---|---|---|
| Beginners (first-time users) | Daily for 7 days | 1 week | Establishes a baseline, identifies persistent problem zones, and builds awareness of brushing gaps |
| Active improvers | 2-3 times per week | 3-4 weeks | Reinforces corrected technique, tracks whether problem areas are shrinking or shifting |
| Maintenance users | Once per week | Ongoing | Catches any regression before plaque accumulates into tartar; keeps habits sharp |
| Orthodontic patients | 3-4 times per week | Duration of treatment | Monitors bracket-adjacent zones where plaque hides; prevents white spot lesions around hardware |
| Children (ages 6-12) | 2-3 times per week | Until brushing independence is consistent | Turns brushing into a visual game; builds technique through repeated feedback loops |
The daily phase during week one is critical. It shows you which zones are genuinely problematic versus which ones you simply missed on a single occasion. If the same gumline patch lights up pink three days in a row, that is a technique issue, not a fluke. If a spot appears once and never returns, your correction already worked.
After that initial week, dropping to two or three sessions per week gives your muscle memory time to consolidate while still catching any backsliding. Eventually, once-weekly use acts like a maintenance audit. You are not learning new corrections at this stage. You are confirming that old habits have not crept back in.
Special Timing Considerations
Certain situations call for temporarily increasing your frequency, even if you have been in maintenance mode for months:
- After orthodontic adjustments: Wire changes and bracket repositioning alter the geometry of your mouth. Areas that were easy to reach last week may suddenly be blocked. Bump your usage back to 3-4 times per week for the first few days after any adjustment.
- When switching brushing tools: A new electric toothbrush, a different brush head size, or a switch from manual to powered brushing all change your cleaning patterns. Use dental disclosing tablets daily for the first week with any new tool to verify it is actually reaching the zones your old tool covered.
- Returning from travel: Vacations disrupt routines. Jet lag, unfamiliar bathrooms, and forgotten floss all contribute to plaque buildup. A disclosing check on your first night home resets your awareness.
- During illness or recovery: When you are sick, brushing often becomes less thorough. A quick disclosing session once you feel better identifies any areas that accumulated plaque during your downtime.
Tracking Your Progress Over Time
Imagine looking at a photo from three weeks ago and seeing heavy pink staining along your entire lower gumline. Then you look at tonight's photo and see only two small patches near your back molars. That visual proof of improvement is more motivating than any dentist lecture.
Here is a simple tracking method that takes less than a minute per session:
- Photograph your results. After swishing and spitting, snap a quick photo of your front teeth, then one of each side with your cheek pulled back. Use your phone's front camera or a small mirror to capture the tongue-side of your lower teeth. Consistent lighting and angle make comparisons easier.
- Note the date and any variables. Did you rush brushing tonight? Did you skip flossing? Were you using a new toothbrush? A one-line note alongside each photo adds context that explains why results might differ from session to session.
- Look for trends, not single data points. One bad session means nothing. Three consecutive sessions with the same stained zone means your technique needs adjustment in that specific area.
- Share with your dentist. Bringing a few comparison photos to your next cleaning appointment gives your hygienist concrete information about your home care. They can offer targeted advice based on real evidence rather than a quick visual inspection during your visit.
Some people keep a dedicated album on their phone. Others prefer a simple notebook where they sketch which teeth showed color and mark whether it was pink (new plaque) or blue (old plaque). The format does not matter. What matters is that you create a record you can reference over time.
The research supports this approach. The Cureus case report used clinical photographs at each follow-up visit to document plaque reduction, and the patient reported sustained motivation partly because the visual evidence of improvement was undeniable. You can replicate that same feedback loop at home without any clinical equipment beyond your phone and a disclosing tablet.
Consistency in tracking also reveals seasonal patterns. You might notice worse results during allergy season when mouth breathing dries out your oral environment, or during stressful periods when you rush through your routine. These insights help you anticipate problem periods and adjust proactively rather than reactively.
With a schedule in place and a tracking habit established, the final piece of the puzzle is knowing what to look for when choosing your next pack of tablets, because not all products deliver the same reliability.
Choosing Quality Disclosing Tablets for Reliable Results
Not every plaque disclosing tablet on the shelf delivers the same accuracy. Some dissolve unevenly, leaving patchy coverage that misses entire quadrants. Others use dye concentrations so faint that even heavy plaque barely registers a tint. The difference between a product that gives you actionable feedback and one that wastes your time comes down to a handful of quality markers you can spot before you ever open the package.
Think of it this way: you would not trust a thermometer that reads three degrees off. The same logic applies here. A disclosing tablet is a diagnostic tool, and its value depends entirely on how consistently and accurately it stains plaque biofilm. Knowing what separates a reliable product from a mediocre one helps you choose wisely, whether you are buying for personal use, stocking a dental practice, or exploring oral care products alongside items like toothbrush tablets for a more comprehensive routine.
What to Look for on the Label
Quality starts with ingredients. Effective dental plaque disclosing tablets rely on well-established, food-grade dyes at concentrations strong enough to produce a clear, vivid stain without overwhelming the mouth with unnecessary chemicals. Here is what to check before purchasing:
- Food-grade dye certification: The active colorant should be an approved food dye such as erythrosine (FD&C Red No. 3) or phloxine B for single-tone formulas. Two-tone products typically add FD&C Blue No. 1 (brilliant blue FCF). As noted by Young Innovations, erythrosine highlights plaque with a bright red stain while FD&C Blue No. 1 adds contrast by staining older biofilm in a different shade. Both dyes should carry recognized food-grade certifications confirming they are non-toxic at the concentrations used.
- Appropriate dye concentration: Too little dye produces faint, ambiguous results. Too much creates excessive staining of lips, tongue, and soft tissue that takes hours to fade. A well-formulated tablet strikes a balance where plaque stains vividly but residual color on clean enamel rinses away with a single gentle swish.
- Absence of harsh additives: Some lower-quality products pad their formulas with artificial sweeteners, strong flavoring agents, or binding compounds that interfere with even dissolution. Look for short, simple ingredient lists. The tablet needs a dye, a binder to hold it together, and possibly a mild flavoring agent. Anything beyond that is unnecessary filler.
- GMP-certified manufacturing: Good Manufacturing Practice certification means the production facility follows standardized quality controls for consistency, purity, and safety. This matters because batch-to-batch variation in dye concentration can make your results unreliable from one tablet to the next.
- Clear expiration date: Dye potency degrades over time, especially if tablets are exposed to moisture or light. A clearly printed expiration date tells you the manufacturer stands behind the product's shelf life. Avoid packages without one.
Two-tone formulas deserve extra scrutiny. The dual-dye system only works when the two colorants are present at the correct ratio. If the blue component is too concentrated relative to the red, even fresh plaque may appear purple, eliminating the age-differentiation benefit that makes two-tone products valuable in the first place. Trusted brands like GUM Red-Cote plaque disclosing tablets and Young Innovations' 2Tone solution have established track records for consistent dye balance across batches.
Where to Buy Disclosing Tablets
Availability depends on your location and how quickly you need them. Here are the main purchasing channels, each with distinct advantages:
Pharmacies and drugstores: Major pharmacy chains carry reveal tablets in the oral care aisle, usually near the floss and mouthwash. Selection is typically limited to one or two brands, but the convenience of same-day pickup makes this the fastest option. Ask the pharmacist if you do not see them on the shelf since some stores keep them behind the counter.
Dental offices: Your dentist or hygienist may sell disclosing tablets directly or provide samples. Products sourced through dental supply channels tend to be professional-grade with reliable dye concentrations. This is also the best place to get personalized recommendations based on your specific oral health needs.
Online retailers: E-commerce platforms offer the widest selection, including specialty two-tone formulas, bulk packs, and liquid disclosing solutions. You can compare ingredient lists, read user reviews, and often find better pricing than brick-and-mortar stores. The trade-off is shipping time and the need to verify seller credibility, especially for lesser-known brands.
When comparing products online, pay attention to tablet count per package and cost per unit rather than total price alone. A 250-count professional pack costs more upfront but works out to a fraction of the per-tablet price compared to a 10-count consumer blister pack. If you are following the usage schedule outlined earlier, especially the daily-use introductory phase, buying in bulk makes practical and financial sense.
For dental professionals, hygiene educators, or entrepreneurs interested in developing private-label oral care products, the manufacturing side of the equation is worth exploring. OEM/ODM manufacturers like ZhuFeng offer customized tablet formulation with scalable production capabilities, enabling businesses to create market-ready disclosing tablets with tailored dye concentrations, specific dissolution profiles, and branded packaging. Their flexible product formats, spanning tablets, powder formulations, and other delivery systems, can help brands launch toothbrush tablets or specialized oral hygiene products without building manufacturing infrastructure from scratch.
Regardless of where you buy, the core principle stays the same. A quality plaque disclosing tablet should dissolve evenly, stain plaque vividly, rinse cleanly from healthy enamel, and deliver consistent results every time you use it. When you find a product that checks those boxes, stock up and make it a permanent part of your oral care toolkit. Your brushing blind spots are not going to find themselves.
Frequently Asked Questions About Disclosing Tablets
1. Are disclosing tablets safe to swallow?
Disclosing tablets use food-grade vegetable dyes like erythrosine (FD&C Red No. 3) or phloxine B that are non-toxic at the concentrations used. While accidentally swallowing a small amount is not harmful, you should spit out the colored saliva rather than swallow it intentionally. The dyes are approved for food use and have been safely employed in dental offices for decades. For young children under 6, parents can crush the tablet and apply it with a cotton swab to eliminate any swallowing concern entirely.
2. How often should you use disclosing tablets?
The ideal frequency depends on your goals. Beginners benefit from daily use for the first week to establish a baseline and identify persistent problem zones. After that initial phase, reducing to 2-3 times per week reinforces corrected technique while tracking improvement. Once your brushing habits are consistent, a weekly session serves as a maintenance audit. Orthodontic patients should use them 3-4 times per week throughout treatment due to the extra plaque-trapping surfaces created by brackets and wires.
3. What is the difference between single-tone and two-tone disclosing tablets?
Single-tone tablets stain all plaque one uniform color, typically pink or red, regardless of how long the plaque has been present. Two-tone formulas use two dyes with different molecular sizes to create a color-coded age map. Fresh plaque under 24 hours old appears pink or red, while mature plaque over 48 hours old stains blue or purple. This distinction helps you identify whether a stained area represents an occasional miss or a chronic blind spot in your technique that needs immediate correction.
4. How do you remove disclosing tablet stains from lips and tongue?
Apply petroleum jelly to your lips before chewing the tablet to create a barrier that prevents dye absorption. If staining occurs, gentle brushing with a toothbrush removes most residual color from the tongue, and a tongue scraper speeds the process. Lip staining fades naturally within a few hours. Dentists recommend using disclosing tablets at night so any remaining color disappears by morning. For surface stains on countertops or sinks, wipe splashes immediately while the dye is still wet since it lifts easily when fresh but can set on porous materials.
5. Can children use disclosing tablets?
Yes, disclosing tablets are safe and highly effective for children when used with age-appropriate modifications. For children under 6, a parent should crush the tablet between two spoons, mix the powder with a few drops of water, and paint the solution onto teeth using a cotton swab. Children ages 6-12 can chew a tablet normally with parental supervision and a reminder to spit rather than swallow. Turning the process into a game where kids find and brush away every pink spot builds better habits through visual feedback rather than verbal instruction alone.